Web developers and designers have been striving to improve website SEO, accessibility, and usability. As a result ranking high in Google Lighthouse is hard work when your WordPress page is complex. We wanted to share our experience of achieving a 100% performance score in the Google Lighthouse audit.
We are in constant evolution to improve our code, functionalities, and site performance. But, how can we validate that what we are doing is creating an impact? There are various applications out there that can help you in this. Yet few can offer the result as per Google’s requirements and benchmarks.
Now, thanks to Google Lighthouse Audit , we can get this done.
What is Google Lighthouse Audit
Google Lighthouse is an open-source audit tool from Google that uses your connection and site data to measure your website’s performance. Ligthouse conducts audits in a few key areas, which include:
- Performance,
- SEO,
- Accessibility,
- Best practices and
- Progressive Web Applications.
It gives you an overview of the user experience and issues you might have in your website.
Understanding Google Lighthouse Score
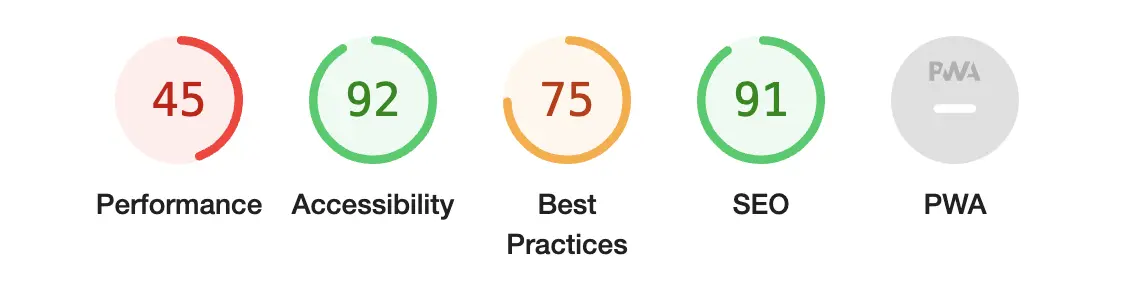
Google Lighthouse audits the web page and classifies it between 0 and 100 in relation to how good the end-user experience is when they visit your page.
A “Good” user experience (green) score is above 90, a “Poor” one (orange) ranges 89 to 50, and a “Bad” end-user experience (red) is a score lower than 50.
Google Lighthouse vs PageSpeed Insights
Lighthouse is integrated directly into the Chrome DevTools, under the “Lighthouse” panel but it’s also used as the test engine in the online performance test tool Google PageSpeed Insights
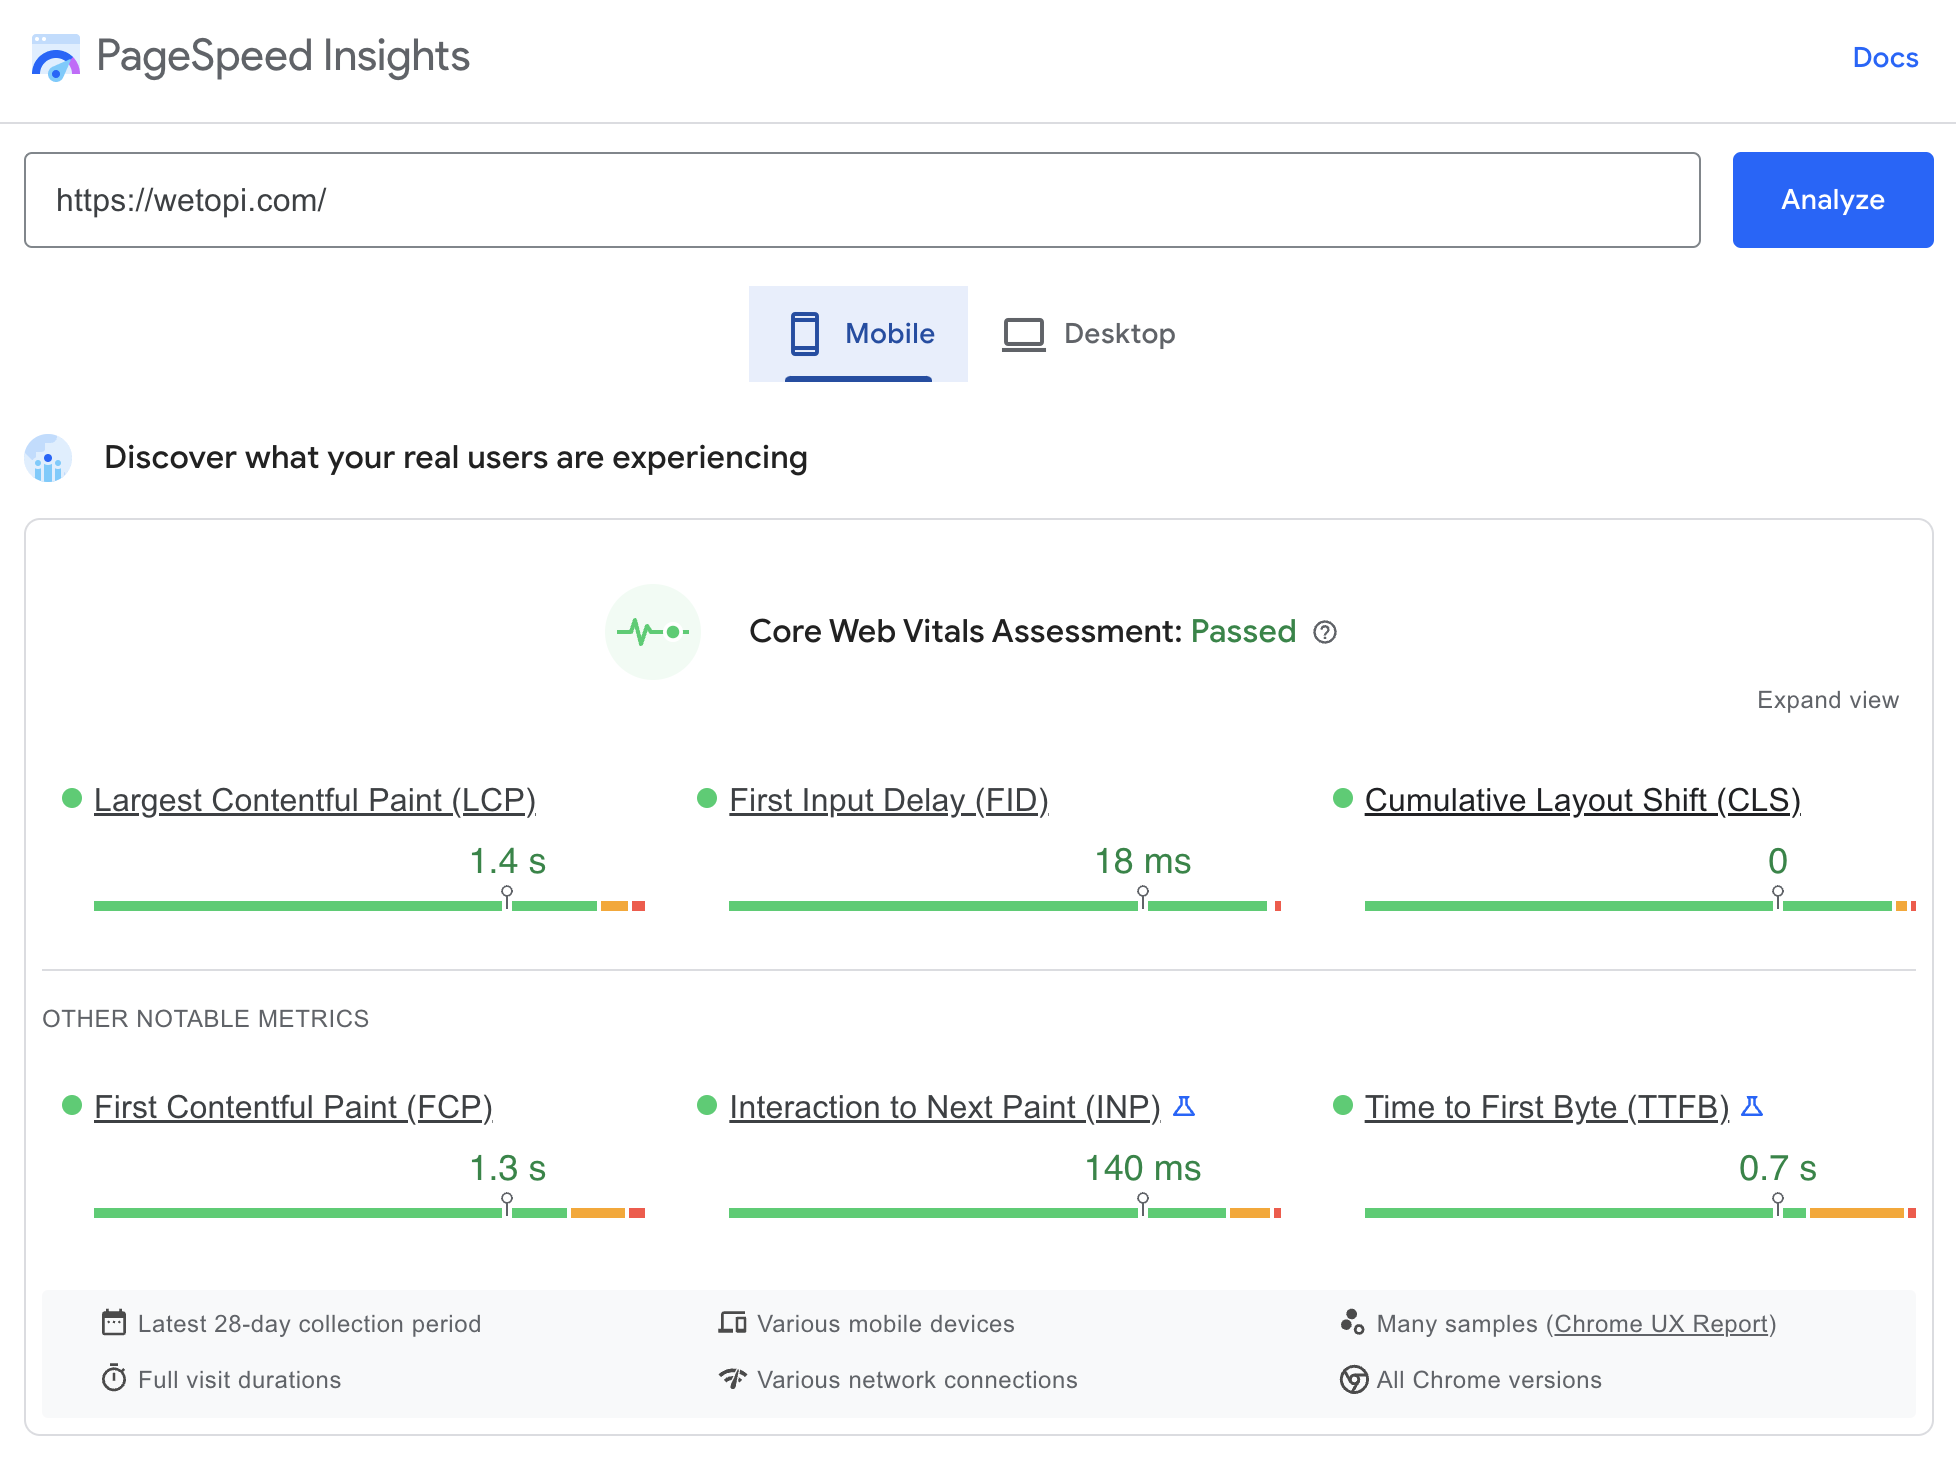
While Google PageSpeed uses the information generated by Lighthouse, enriching it with data from your audience,
Lighthouse delivers you more than just “Performance”, auditing other aspects like SEO, Accessibility, Progressive Web App, etc.
Additionally, If you are a developer you can also run Lighthouse programmatically. Google Lighthouse is available as a nodejs module you can run from code or command line.
Lighthouse Audit: first steps
In this section, we will share with you how we improved our website’s Google Lighthouse audit score.
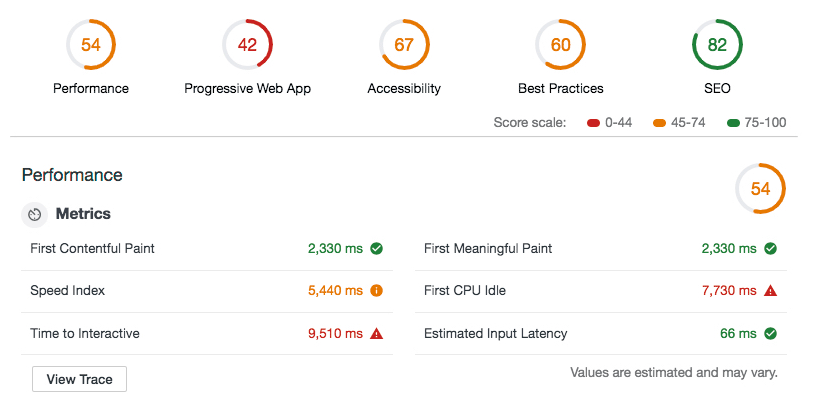
- We were here:
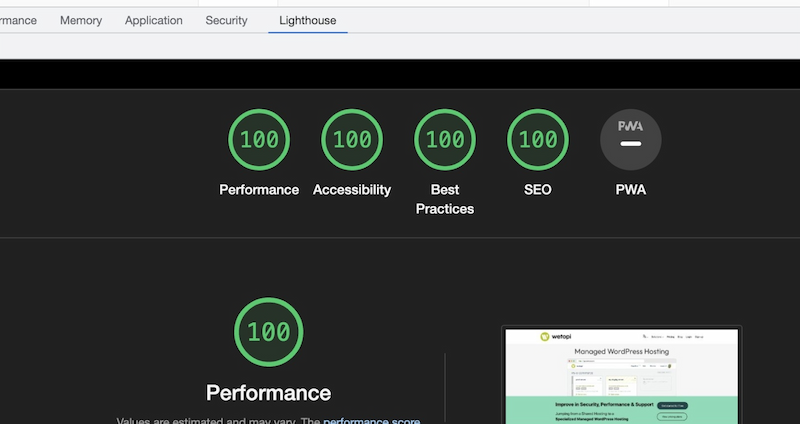
- and after moving to Twenty Twenty-Two:
We started with low expectations. Our initial site was built on top of an old and over-bloated theme. At that moment, we ended up with an impressive result taking into account where we started off.
This year we however moved our site to the latest WordPress Full Site Editing theme “Twenty Twenty-Two”.
We are still shocked! We never thought it would be so easy to get a full 100 in all tests with this so young WordPress Full site Editing Theme.
How do I open Google Lighthouse?
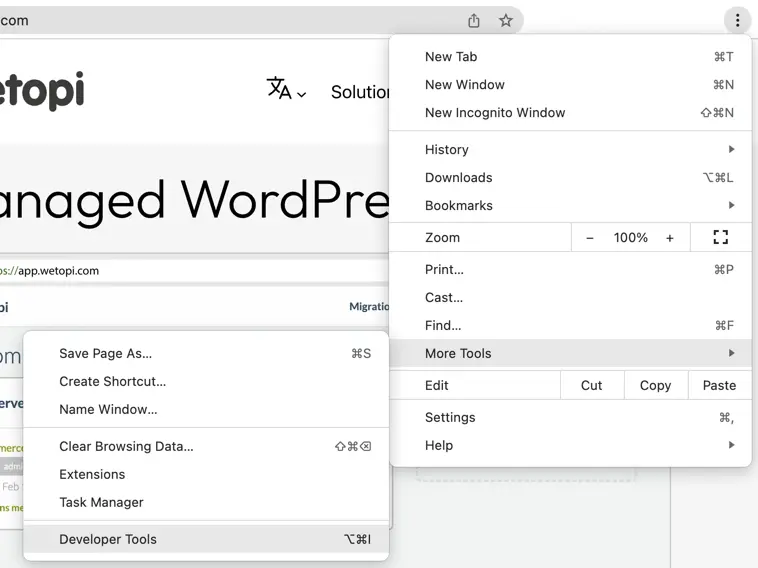
You can find the Lighthouse in your Chrome browser Developer Tools.
To open the “Developer Tools”, select:
- “Top Menu→View→Developer→Developer Tools” or
- “⌥+⌘+I” on Mac or
- “F12+Ctrl+Shift+I” on Windows.
Note: you can also open it from the top right “Three dot menu”:
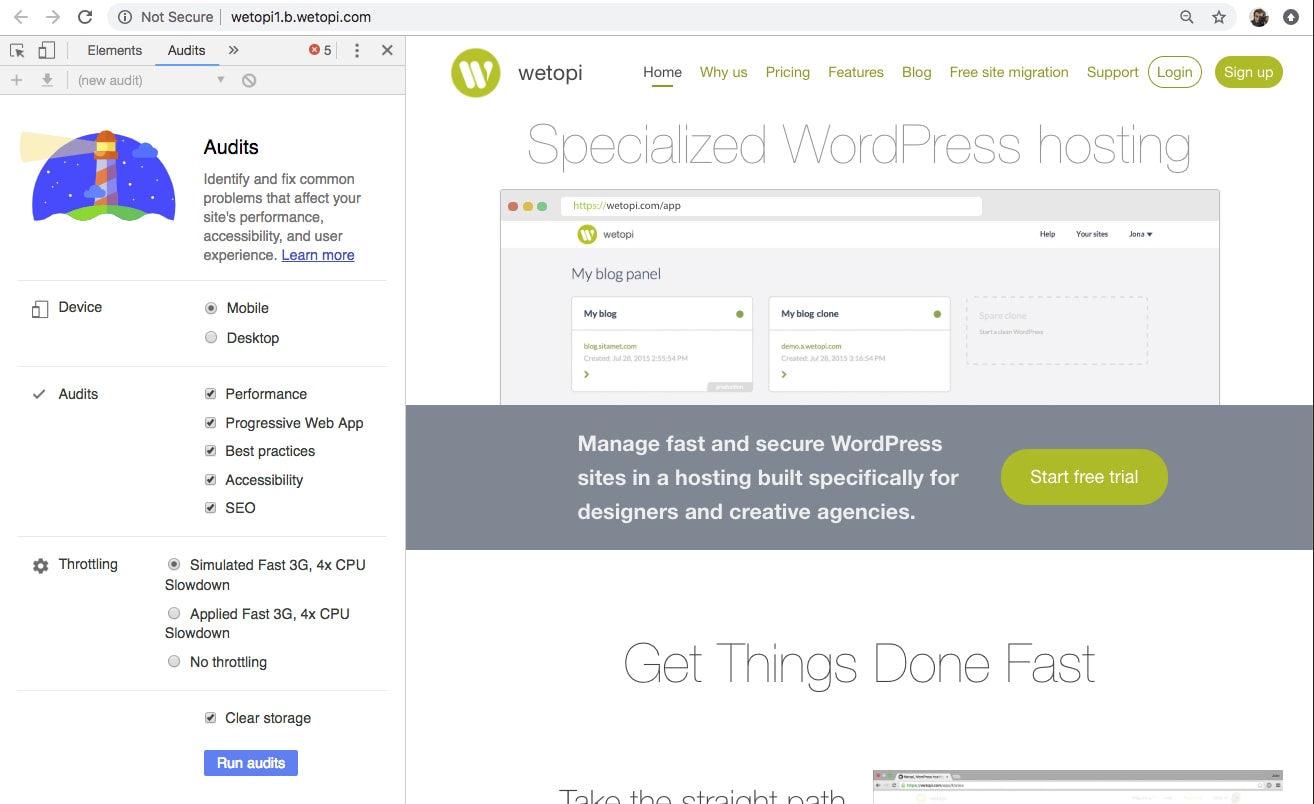
On the top bar where you see Elements, Console, … choose Audits.
Scroll down through the options and click Run audits.
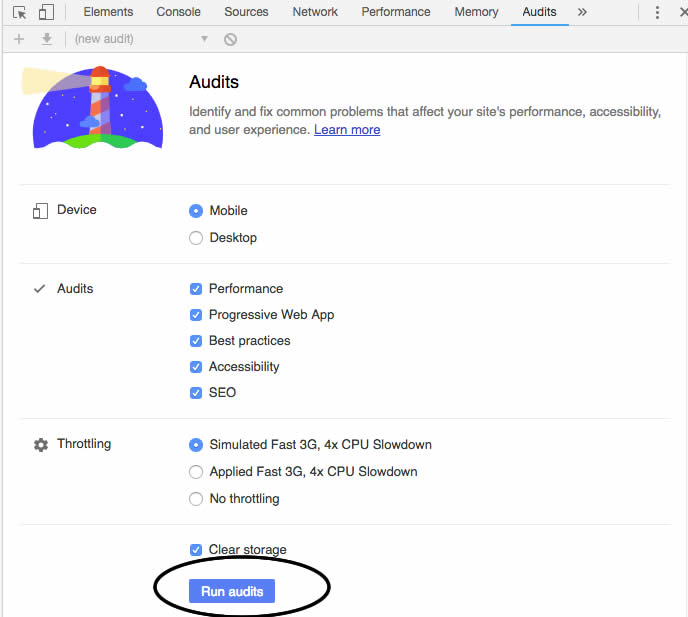
Set Google Lighthouse options
A good start is to run the Audits with the default options:
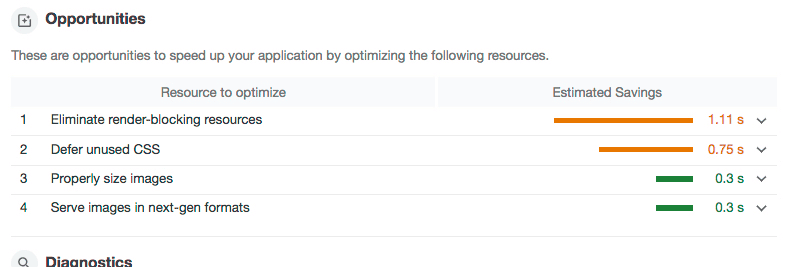
After a few seconds, the audit finishes and Google Lighthouse shows us a list of opportunities sorted by “Estimated Savings” in seconds.
Let’s tackle the first optimization opportunity.
Working on the opportunities Google Lighthouse report suggest
This was our first refactoring effort focused on the Google Lighthouse audit tool. We decided to take the experimental approach and work our way through the report findings.
Let’s get to the details. We will reproduce the steps in our staging server.
With Wetopi you get FREE Development Servers, Brotli ready,
Signup in 10 seconds and get your free wetopi account
and finely tuned to serve WordPress at lighting speed.
Defer unused CSS
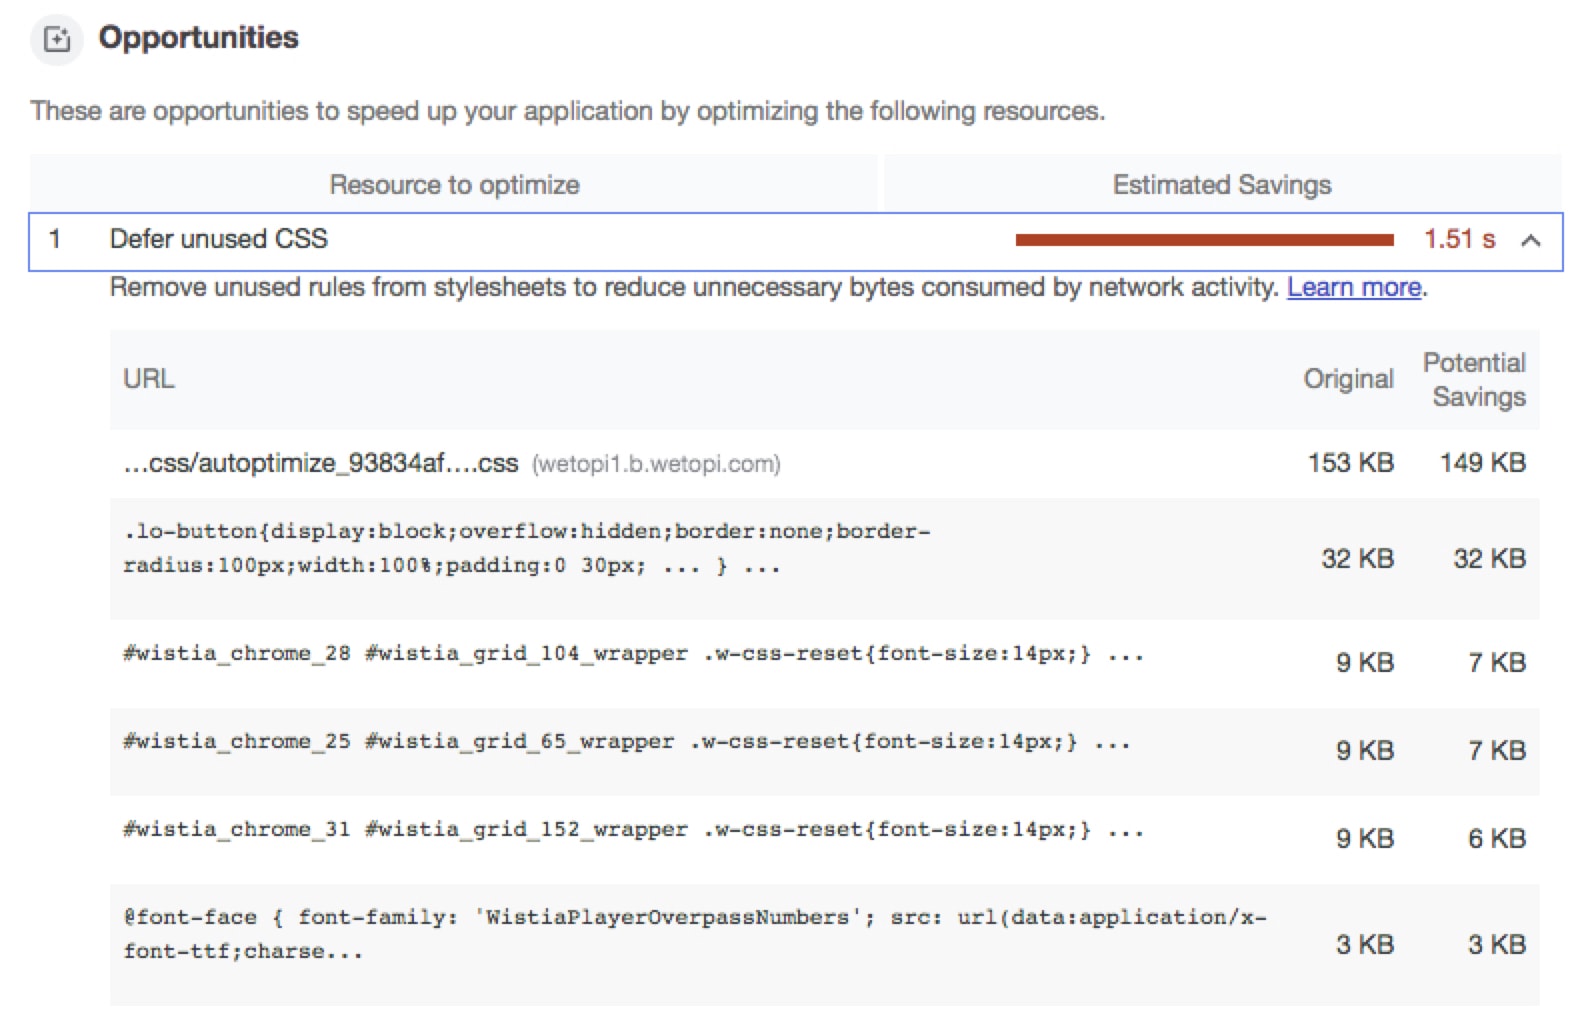
We were loading a huge CSS file.
If you work with an all-purpose WordPress theme, this is the price to pay.
In our case, we took the decision manually clean this CSS file. We removed the features we knew were not used, eg. all the woo-commerce styles.
Replacing the main style CSS file
To take control of our theme CSS, we dequeue the theme’s main style and replaced it with our curated one adding an wp_enqueue.
In our functions.php of our Child Theme we added this piece of code:
function my_load_child_scripts() {
    wp_dequeue_style( THEME_SHORT.'-theme' );
    wp_deregister_style( THEME_SHORT.'-theme' );

    wp_enqueue_style( THEME_SHORT . '-child-theme' , get_stylesheet_directory_uri() . '/style.css', array(), false, 'all' );
}
add_action( 'wp_enqueue_scripts', 'my_load_child_scripts', 100);
Identifying unused CSS code
To help us identify unused blocks of CSS code, we used the Coverage Chrome Developers Tool.
This “curation” task requires a lot of time. We ended up reducing our style.css by half of its original size. Mainly stripping woo-commerce, all the slider features, and other not used CSS codes.
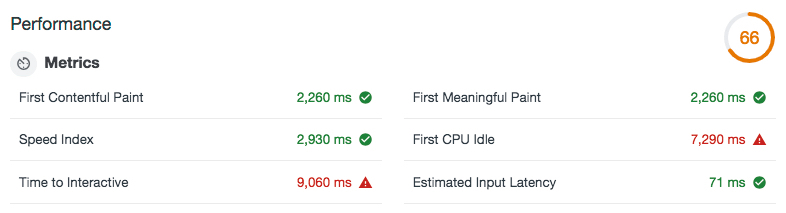
The result? We jumped from 54 to 66 in audit Performance score:
Defer offscreen images
This “Defer offscreen images” has a potential estimated saving time of 1.05 seconds!
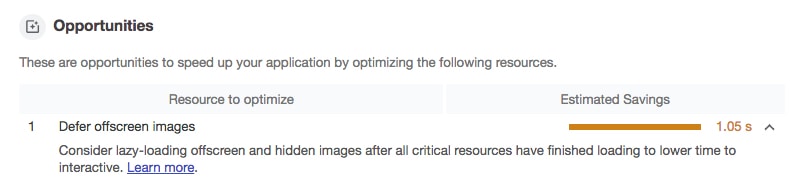
Google did a great job giving a “Learn more” to help us solve the problem.
Offscreen images are images that appear Below the Fold. Or, to put in another way, if users can’t see offscreen images when they load a page, then there’s no reason to download the offscreen images as part of the initial page load.
Lazy Loading forces images to load only when they are “above the fold” – in other words, only images that come into view in a user’s browser will load.
Native Lazy Loading Arrived with WordPress 5.5. In our current WordPress, we removed this plugin.
If you prefer the idea of a plugin to solve your lazy loading needs, after some research looking for the fastest and lightest plugin to resolve this problem, we solved this first optimization with Lazy Load by WP Rocket. It is currently active on over 20,000 installs with a 4 out of 5-star rating. The best advantage of this plugin is that it weighs less than 10 KB. There are no options to configure: merely install the plugin, and lazy loading will work.
NOTE: after the Lazy Load install, please go to your WordPress admin settings and select the lazy load of images.
The lazy load moved us from 66 to 70 in audit performance score.
Add the Preconnect tag
Establishing connections often involves significant time in slow networks, particularly when it comes to secure connections, as it may involve DNS lookups, redirects, and several round trips to the final server that handles the user’s request. Informing the browser of our intention is as simple as adding a “preconnect” link tag to our page:
We must add the “preconnect” in our head tag. To do modify headers, we have to edit, in our child theme dir, the header.php
<link rel="preconnect" href="https://www.google-analytics.com">
<link rel="preconnect" href="https://stats.g.doubleclick.net">
Eliminate render-blocking resources
In the Google Lighthouse Report’s Opportunities’ list, it’s common to find a “dance” between “Defer unused CSS” and “Eliminate render-blocking resources”. That’s to say, when you fix one, the other comes up, and the other way around . Now it’s time to reduce the javascript.
Removing videos and its blocking js code:
One big decision we took was to remove the video embeds from our external video service Wistia. We observed in Audits that Wistia CSS and javascript were blocking the rendering execution. Even the served thumbnails weren’t at all optimized.
We replaced video embeds with simple infographic explanations.
Removing jQuery migrate:
Also, another cleanup we did was to remove jQuery migrate (our chrome console log gave us the clue showing a “JQMIGRATE: Migrate is installed, version 1.4.1″)
jQuery Migrate simplifies the process of moving older jQuery code to a newer jQuery versions by identifying deprecated features. In our case, jQuery Migrate is not needed, we are running updated plugins and themes.
Let’s try our site without it.
Let’s add this code to our functions.php
//Remove JQuery migrate
function remove_jquery_migrate( $scripts ) {
    if ( ! is_admin() && isset( $scripts->registered['jquery'] ) ) {
        $script = $scripts->registered['jquery'];

        if ( $script->deps ) { // Check whether the script has any dependencies
            $script->deps = array_diff( $script->deps, array( 'jquery-migrate' ) );
        }
    }
}

add_action( 'wp_default_scripts', 'remove_jquery_migrate' );
This piece of code, when not in wp-admin, checks if we register jQuery then we remove jQuery-migrate from the dependencies array.
Always check all your site pages and corners if they are functioning as expected. In our case everything was fine!.
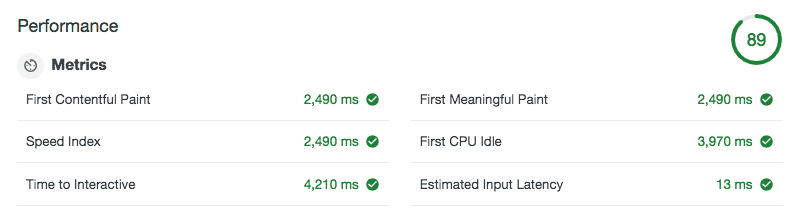
And an Audit lighthouse re-run gave us our first green 89 Score in performance:
Serving our google fonts and tuning with font-display:
Continuing our task to reduce blocking. Google audit suggests setting font-display fallback.
The new font-display descriptor for @font-face lets developers decide how their web fonts will render (or fallback), depending on how long it takes them to load. The idea is not to block the rendering process so font-face is rendered with a fallback at first if it’s not loaded, but the font swaps as soon as it loads.
Also, another improvement we can do is to serve the google fonts from our server. Our wetopi servers are ultrafast and have a better cache policy.
We will disable all the google fonts in our theme admin panel and download the files.
Here is a tip. Google fonts site does not provide all the font formats! we want at least woff and woff2. We found this project online: http://google-webfonts-helper A Hassle-Free Way to Self-Host Google Fonts. @majodev Thanks!
This is how we self-host our Google Fonts:
@font-face {
  font-family: 'Roboto';
  font-style: normal;
  font-weight: 100;
  font-display: fallback;
  src: local('Roboto Thin'), local('Roboto-Thin'),
       url('/wp-content/themes/angle-child-theme/fonts/roboto-v18-latin-100.woff2') format('woff2'), /* Chrome 26+, Opera 23+, Firefox 39+ */
       url('/wp-content/themes/angle-child-theme/fonts/roboto-v18-latin-100.woff') format('woff'); /* Chrome 6+, Firefox 3.6+, IE 9+, Safari 5.1+ */
}

@font-face {
  font-family: 'Roboto';
  font-style: normal;
  font-weight: 300;
  font-display: fallback;
  src: local('Roboto Light'), local('Roboto-Light'),
       url('/wp-content/themes/angle-child-theme/fonts/roboto-v18-latin-300.woff2') format('woff2'), /* Chrome 26+, Opera 23+, Firefox 39+ */
       url('/wp-content/themes/angle-child-theme/fonts/roboto-v18-latin-300.woff') format('woff'); /* Chrome 6+, Firefox 3.6+, IE 9+, Safari 5.1+ */
}

@font-face {
  font-family: 'Roboto';
  font-style: normal;
  font-weight: 400;
  font-display: fallback;
  src: local('Roboto'), local('Roboto-Regular'),
       url('/wp-content/themes/angle-child-theme/fonts/roboto-v18-latin-regular.woff2') format('woff2'), /* Chrome 26+, Opera 23+, Firefox 39+ */
       url('/wp-content/themes/angle-child-theme/fonts/roboto-v18-latin-regular.woff') format('woff'); /* Chrome 6+, Firefox 3.6+, IE 9+, Safari 5.1+ */
}
Testing changes in a Staging server
The Google Lighthouse Audit Report will suggest lots of changes. Staging environments are the perfect solution to test all changes without risking your site in production. At Wetopi, we offer two staging servers to every WordPress installation to make a clone of your site and/or recover backups.
Save your website: don’t test in production!
When testing new server configurations, it is highly recommended to work on a “localhost” or “Staging” server.
If you don’t have a development WordPress server, signup at wetopi, it’s FREE.
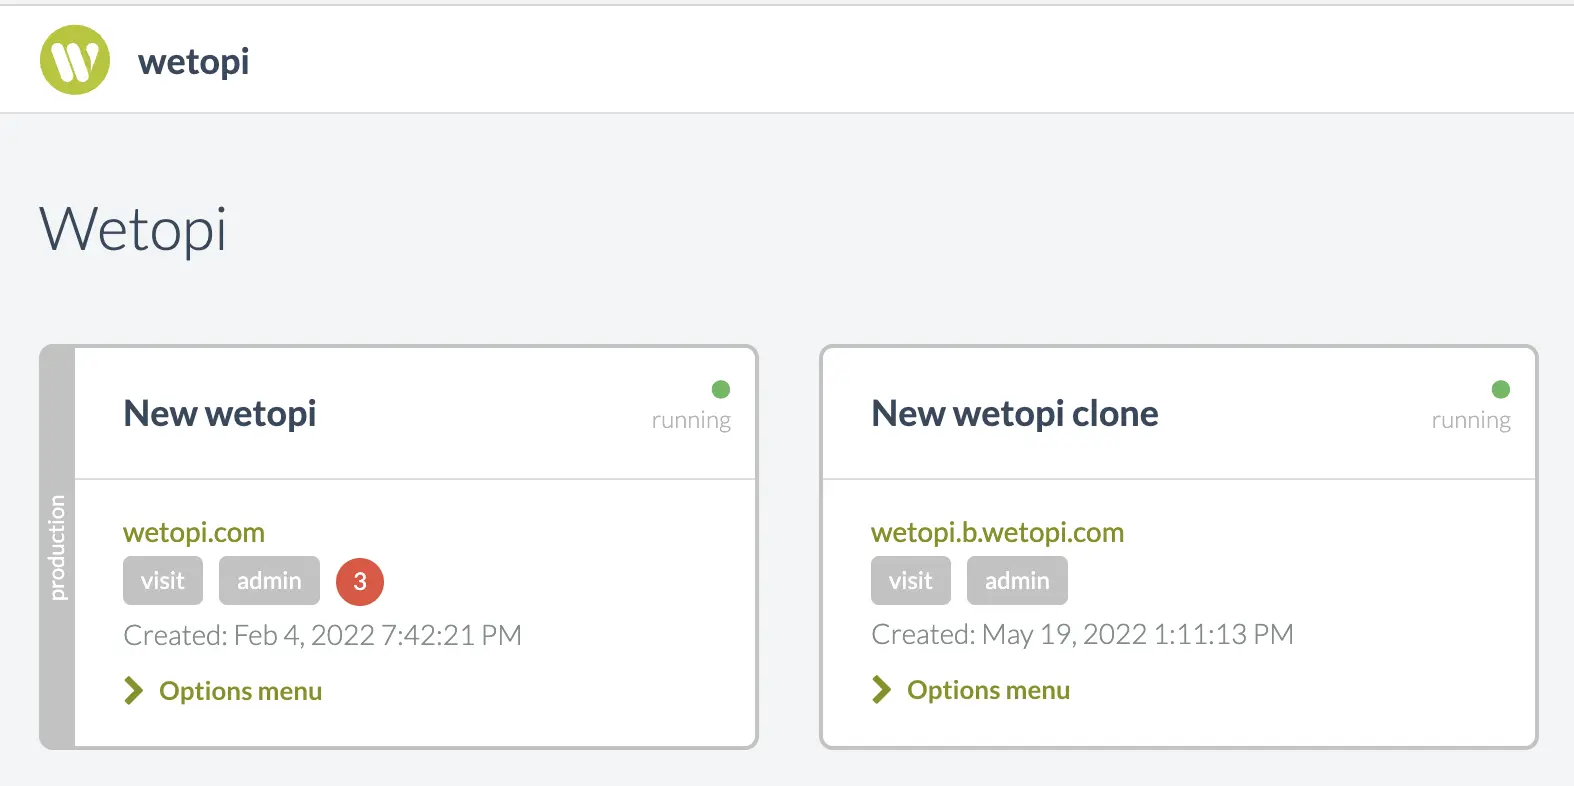
Let’s clone our site with our wetopi cloning tool. This creates a new server in a few minutres, running in a development subdomain:
Introducing Cache and secure connections with HTTPS
In this performance step, we will enable our cache plugin WP Super Cache and enable the Letsencrypt certificate to serve pages with HTTPS.
The only downside is that HTTP/2 requires a secured connection. This means adding more time to dealing with HTTPS and Secure Certificates.
En Wetopi dispones de servidores con las últimas versiones y protocolos de seguridad.
But we are confident in our infrastructure, servers are finely tuned and use the latest protocol HTTP/2 with TLS 1.3
The result? Awesomeness 2.0!
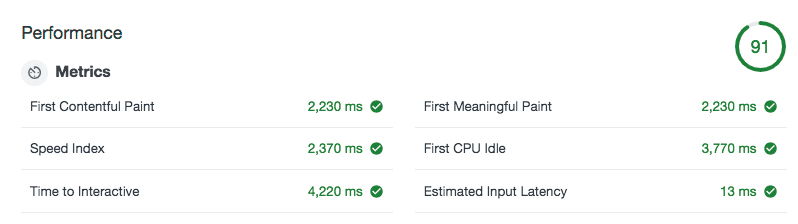
Thanks to HTTPS, we jumped to the “green scores” in performance and also in Best Practices.
At this point the Opportunities list is short:
The first point still points to the CSS and javascript. We decided to spend more time finding more unused styles to reduce the size. While working on the cleanup, what we discovered was that we were loading javascript code of plugins that were not required on the home page.
To be more “selective” in “how” and “when” plugin assets are loaded we can take two directions:
- Use a plugin capable of taking control over javascript and CSS asset loading: e.g. W3 Total Cache. It gives us the control to use the “defer” and “prefetch” techniques.
- Code in our functions.php the logic to load plugins only when required. Or find a plugin to help in this selection.
All things considered, we bet on the last option. The downside is though, that we can render the browser cache system useless if we are aggressive in plugin combinations. We can potentially end up ruining the browser cache strategy by having a different concatenated javascript and style CSS file in each and every site page.
Splitting plugins into two blocks was our approach: a plugin combination for our corporate site pages and a second one for our blog posts.
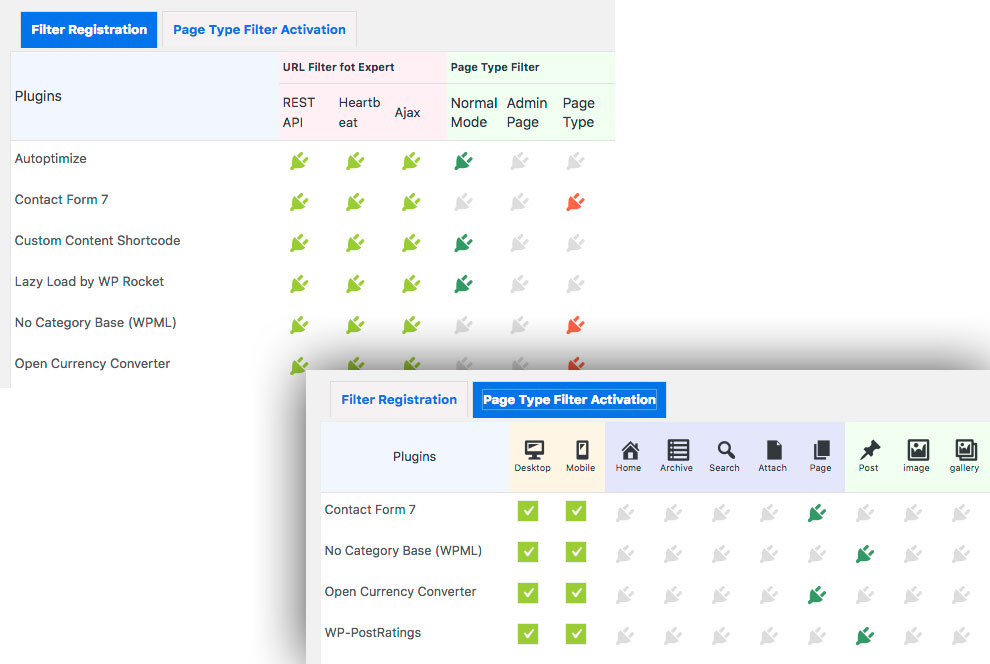
We installed the “Plugin Load Filter” to implement this approach. This plugin lets you enable/disable plugins depending on lots of criteria. Be careful, don’t get crazy!
In short, it gives you a config page with 2 tabs. On the “Filter registration” tab you decide the plugins you want to control. Then, for those plugins you want to manage based on “Page Type,” you can switch to the second tab “Page Filter Activations”. This is where you can go crazy. In our case we were “binary”, and we restricted ourselves to the “Page” or “Post” filter options:
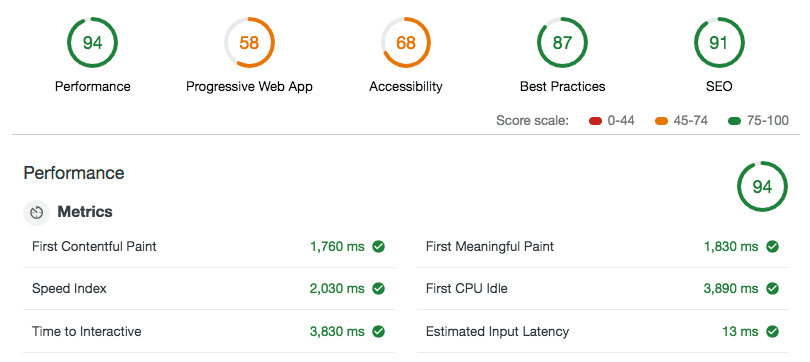
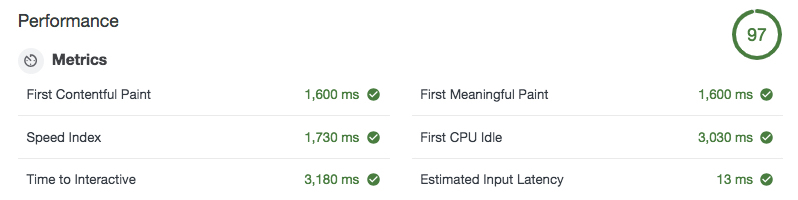
This has reduced the size of our main javascript giving us a decent 97 in performance and a decent First Full Content Paint time of 1.6 secs in 3G networks:
We are satisfied with the performance score, lets’s go to the next Lighthouse Audit section.
Mastering Progressive Web App
Progressive web applications (PWAs) are a type of application software that load like regular websites in any type of device, whether desktop or mobile devices, and that can offer functionalities such as working offline, push notifications, etc.
Not every web page needs this offline functionality. In our case, our customers usually go to our web page to click the login button. If our website goes down, they will lose the path to the wetopi hosting panel. Sounds good to add this offline functionality to our customers.
WordPress plugin ecosystem is like Doraemon’s pocket: There will always be a plugin to solve your problem:
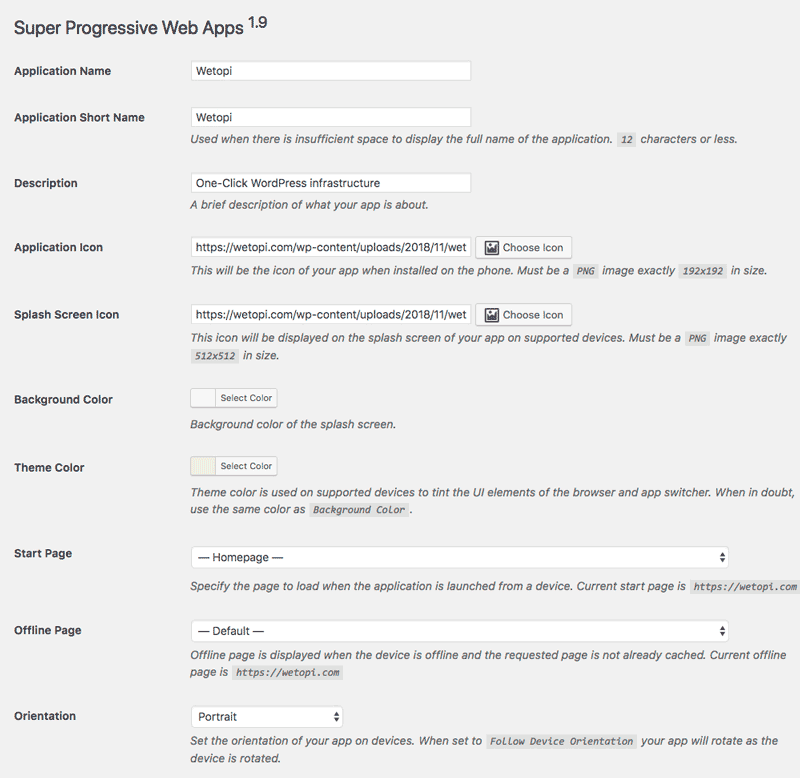
Searching for Progressive Web App, we found SuperPWA. This plugin is awesome. We installed it and configured it by merely uploading our app icons. Actually, in less than an hour, our PWA was up and running.
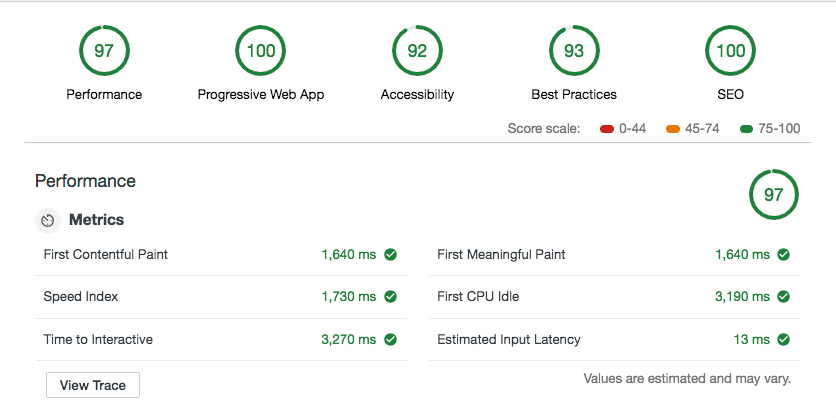
The Lighthouse Audit result was an impressive 100!
Thanks to Super PWA for creating this awesome plugin and making it available to the WordPress community.
At that point, we were green and reached the 100 Score in all sections. Comparatively to former points, the accessibility and SEO list of fixes were easy to resolve: especially the main images without alt descriptions and buttons without accessible names.
All in all, we are satisfied with the overall result for the amount of time invested. Moving Accessibility-score and Best Practices Score to the 100 would mean a change in design and Theme.
Consider not using PWA for your WordPress
PWA optimizes your WordPress site for Google’s SERP spiders. This is a “must-have” if the Page Load Time of your site is a problem.
When we moved our Wetopi site to the last “Twenty Twenty-Two” full site editing Theme, the Page Load times were so low that we decided to remove the PWA functionality. In the end, one less plugin also means more speed.
Extra Bonus to improve WP performance
Additionally, here there are a couple of considerations to keep in mind when it comes to WordPress performance.
Reduce plugin pressure.
Adding plugins means adding load to our server and to our end-user browser.
Do not install plugins you strictly do not need.
Especially those plugins with impact in the front end. Plugins add load to our website. Plugins add unnecessary style sheets and javascript which leads to a
Build on top of light themes.
In our next website “refactoring” we’ll take special attention to the theme selection. The Theme is a crucial piece of a WordPress site. Everything depends on it.
In our last web restyling, we decided to embrace the Full Site Editing feature of the last WordPress Core generation. The result was impressive.
We installed the “Twenty Twenty-Two” and updated all our media to SVG and WebP. With this simple change, we jumped immediately to 99~100 in the Audit results.
I hope we have enlightened you on how you can increase your website speed using the Audits panel of Chrome DevTools aka Google Lighthouse.
If you plan to optimize your own site, count on us.
With wetopi, you have free development servers and free migrations. Let’s migrate a copy of your production site and start with the Google Audit Optimization now!
Don’t you have an account on Wetopi?
Free full performance servers for your development and test.
No credit card required.